Simple landscape photography is about capturing the essence and beauty of a scene. There are some rules that you can follow, regardless of whether you are taking photos of a large landscape or just one tree. We'll discuss the Rule of Thirds (using a wide-angle lens), using a filter that polarizes, and how to use it.
Rules of thirds
The Rule of Thirds is an essential composition technique that can be used for landscape photography. It is the idea of creating a composition that highlights two elements of the scene: sky and land. The horizon should appear in the upper third, and the rest of it should be made up of land.
The Rule of Thirds (or Rule of Thirds) is a simple composition method that can create dynamic pictures. It is not necessary to adhere to this rule. It is possible to break the rule if you wish to create a new composition. A portrait might look better if the subject is located in the center of an image. A landscape composition, on the other hand, is more flexible. These simple compositional guidelines are good to follow. This guideline can help you to see a photograph differently and take better photos.
Wide-angle lenses are recommended
A wide-angle lens can be a great way to capture beautiful shots of simple landscapes. This lens allows you to capture the entire landscape. You should take care when creating such images. Avoid including objects that will create a busy or chaotic scene.
Wide-angle lenses can make difficult to see the details in your foreground. To see the lens' effect, it is best to keep the camera close to your subject. You should also consider the foreground of the photo, since small objects may appear larger than their surroundings.
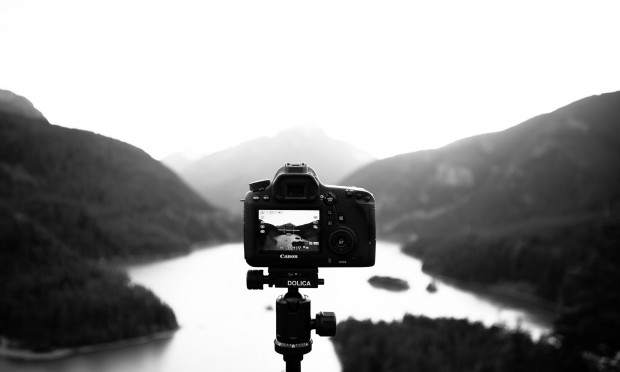
Use a tripod
Tripods are a great tool when shooting landscape photography. A tripod not only keeps your camera steady, but also lets you adjust the height to get the best angle. You can also increase the sharpness and clarity of your images by using a tripod head. Here are some tips for shooting landscape photos with a tripod.
A tripod is extremely useful when you are shooting panoramas. This is a common technique to photograph simple landscapes. Your tripod should be set up and leveled. It's a good idea to have a tripod head that has a built in spirit level. This makes it much easier. Mount your camera and then rotate it to check the composition. A tripod allows you to keep your camera in the same horizontal plane. This allows you to ensure consistent focus and exposure throughout the series.
Use a filter that is polarizing
Use a polarizing lens for landscape photography to enhance the appearance of your images. It is important to keep in mind that a polarizing filter should not be used as a requirement. It can cause a poor-quality photograph to be lost. To avoid this, make sure to use a high-quality polarizing filter.
You should start with a larger scene before moving on to different polarization levels. First practice with reflections or water before you try different landscapes. You'll also want to focus manually before rotating the polarizer. By doing this, you can focus on your subject as you rotate and adjust the polariser.
FAQ
What equipment is necessary to begin digital photography
You should first consider what kind of camera you want when you begin digital photography. There are many options available, including DSLRs (digital single-lens reflex cameras), compact point-and-shoot cameras, camcorders and smartphones. Each camera has different benefits and features. DSLR cameras, however, are larger and heavier than most other types of cameras. Point-and–shoot cameras can be smaller and lighter than DSLR cameras, and they often have automatic settings that allow for special situations. Camcorders can record excellent video and have some still photography modes. Smartphones can be small and lightweight and are easy to transport.
Once you've made a decision about the type and model of camera you want, then you must decide whether you want to buy it new or used. Cameras that have been used in recent years can often be found for a reasonable price. Because manufacturers invest large sums of money in developing new technology, new models tend to be more expensive.
Next, you'll need to buy lenses. Lenses are a critical part of determining the quality your photos. They let you adjust the focal length to zoom in and out of the scene, without losing focus. Some lenses come with built-in flash units while others need external flash units. There are many brands that offer a wide variety of lenses, each with its own unique characteristics.
You will also need memory cards. Memory cards are used to store images taken with your camera. Your card's size will determine how many pictures it can store. You will need multiple memory card if you plan on taking many photos.
Do I Need A Tripod?
This is one question that everyone wants to know. A tripod isn’t always needed, but it can be very useful.
This allows you to keep your camera steady even when taking slow shutter speeds. A tripod can make all the difference when you're photographing landscapes or other stationary subjects.
However, tripods can blur the images of moving subjects like sports and people. How can you tell which situations call for a tripod and why?
A tripod is useful in situations where you want to take pictures of fast action and stationary subjects. Examples include:
-
Sports
-
People
-
Landscapes
-
Close-ups
-
Macro shots
This test will help you determine if you need a tripod. Look through the viewfinder with your camera steady. A tripod is necessary if you notice blurred lines or movement.
If you don't see any blurring, you probably won't notice any improvement by adding a tripod.
These tips will help you make the right decision about whether to invest in a tripod.
-
Smooth legs are important for tripods. This prevents unwanted vibrations from shaking your camera.
-
Choose a sturdy tripod. Some tripods are made out of plastic and may not be very durable. Consider a tripod made of metal.
-
You might consider purchasing a remote control. This remote control lets you remotely control your camera. It can automatically fire the shutter when you press the button.
-
Look for a tripod that has a 360-degree rotating head. This makes it easier to position your camera vertically or horizontally.
-
Keep in mind that tripods aren't cheap. Expect to spend between $100 and $200. However, you'll get a lot of value for your money.
-
Don't forget accessories such as memory cards or filters.
-
Before you buy online, make sure to check your local shops. Many retailers offer shipping free of charge.
-
Read reviews to determine what customers think about a particular product.
-
Ask family members or friends to share similar products.
-
Visit forums and message boards to learn about customer experiences.
-
User reviews can be found online.
-
Amazon.com makes it easy to compare prices and see customer feedback.
-
Browse photo galleries to get an idea of what photographers do with their tripods.
Which Camera Should I Buy?
It all depends upon what kind of photographer your goal is to become. If you are just starting out, a basic point-and shoot camera is all you will need.
However, once you've mastered the basics, you'll likely want something more advanced. The choice really comes down to personal preference.
Before you buy a camera, here are some points to remember.
-
Features: What features do you need? Will you use manual settings or autofocus? What number of megapixels has your camera? Is there a lookfinder?
-
Price: What amount are you willing spend on your camera? Are you planning on upgrading your camera every two years?
-
Brand: Is it possible to be happy with your brand choice? There's no reason why you should settle for less than the best.
-
Functionality: Does your camera perform well in low light conditions? Are you able to take high-resolution images?
-
Image Quality: How clear and sharp are your images?
-
Battery Life: How long can your camera last before it needs to be charged?
-
Accessories: You will be able attach additional lenses, flashes and other accessories. ?
What camera is the best for beginners, and why?
The best camera to use for beginners is dependent on your needs, budget, and skill level.
For instance, you could choose a point & shoot digital camera if your goal is to save some money. These cameras can be very versatile, but they offer excellent quality.
The Digital Single Lens Reflex (Digital DSLR) camera allows you to interchange lenses, allowing you to take different kinds of photos. These are typically more expensive than point-and-shoots, but they provide much greater flexibility.
A beginner's package is a great way to get started in photography. You'll find everything you need in one package, including a camera body, lens, memory card, tripod, and flash.
Also, don't forget about extra batteries!
Which Lenses Should I Use?
Most beginners will ask this question: "Which lens should I buy?" There are many options. It can be difficult to make a decision.
The good news is that you don't necessarily need to buy a new lens every time you purchase a new camera. You can instead add lenses later.
Here are three types you might be interested in.
-
Wide Angle Lens (14mm-24mm): These lenses have a wide view angle that will allow you to capture more of your subject. Zooming in can be done without affecting image quality.
-
Normal/Standard Zoom Lens (28mm to 70mm) : These lenses allow you the flexibility of changing focal lengths, while still maintaining high quality images.
-
Telephoto Zoom Lens (70mm-200mm): These lenses can be used to capture distant subjects. They let you focus on your subject even though they appear small in the frame.
These lenses can be combined to create different effects. You can use a normal lens for close-up detail and switch to a zoom lens to capture distant objects.
Light Room is an excellent tool to enhance your images.
The best way to ensure you have the perfect photos for your project is to start early. It is always better to take as many photos as you can and then choose the best.
Lightroom makes it easy to do this. It lets you see how different settings impact each photo. You can also adjust these settings on-the-fly without going back into Photoshop. This allows you quick experimentation to see what looks best and what doesn’t.
Statistics
- Get 40% off Adobe Creative Cloud(opens in new tab) (creativebloq.com)
- In this case, 100% of readers who voted found the article helpful, earning it our reader-approved status. (wikihow.com)
- There are people out there who will pick at flaws they can only see in 100% crops of your photos. (wikihow.com)
- By March 2014, about 3 million were purchased monthly, about 30 percent of the peak sales total. (en.wikipedia.org)
External Links
How To
How to take photographs in low lighting conditions
Low-light photography is the art of taking photographs in dark or dimly lit environments. It requires special equipment. Controlling exposure, white balance, sharpness, and contrast are the main challenges. There are two types low-light photography: ambient and flash. Flash photography is best when there is enough light. A flash is required if there isn’t enough light. A flash might be necessary if you are photographing a subject indoors and outside. Try shooting at night, during the moonlit hours, if you don't need a flash. You will get beautiful shadows and colors. Another option is to capture at twilight. Twilight occurs when there is still daylight but the sun has set.
Long exposures are also an option. Long exposures enable you to take images even after your shutter has been open for several seconds. The camera records only light that falls on it if the shutter is not closed. This light will continue to fall onto your sensor after a long exposure. But, the shutter remains closed and no new light enters. You will see very little movement as a result. To ensure a clear image, you should turn off all automatic settings such autofocus or exposure. You should also adjust the ISO setting prior to you start taking photos. An ISO setting of 200 will give you more control over the brightness or darkness of your image. Finally, when you're ready to take the shot, press the shutter button quickly. This will cause the shutter to close completely. Hold the shutter button down for the final second. You will prevent additional light from entering your camera by keeping the shutter button down. Once you take the shot, wait a while before you release the shutter. This will allow the camera to process your image. While the image is processing, you can see your photos on your computer monitor. Once you are satisfied, save them on your computer.