
You can begin by looking at the features offered by a Sony camera if you're looking for a low-cost option. These features include the size, price, AF system, as well as other factors. Once you narrowed down your choices you can place your order and get your new camera in your hands as soon as possible. Buying cheap Sony cameras is not as difficult as it might seem if you know what to look for. Below we will take a look into some of the most popular choices.
Features
If you want to buy a camera at a cheap price, look for a Sony model that is under $500. A lower-priced model could offer better value than a model with more features. Sony's cheaper cameras may lack some of the high-end features, like 4K video and an OLED digital viewfinder. However, there are great cameras that will give you better value for money.
Price
Although the Sony A7 IV camera might be expensive, it is still a great value. The best combination of excellent image quality, high speed performance and advanced 4K video modes makes this camera a favorite among professionals and hobby photographers. The camera's cost is very affordable, especially when compared with the A7 III which is more budget-friendly. There are other great cameras, such as the Sony A6400 or A6500.
Size
There are many inexpensive Sony cameras. Sony is a Japanese multinational company which designs, develops and markets a wide range of electronic products. Its cameras are known worldwide for their fast autofocus, compact size and reliable performance. They are designed to satisfy the needs and desires of amateur, hobby, and professional photographers. There are two main types Sony cameras. The A7III and the a7IV.
AF System
The AF system on Sony digital cameras is very reliable and can be easily configured once. The autofocus system of the Sony a1 can track eyes both from animals and humans. When the subject moves away from the camera, it automatically switches between generic tracking mode or eye detection. The Sony a7RIV has an upgraded AF system with 567 focal-plane phase-detection AF points and 425 contrast AF points. It covers 74%. Tracking performance is dramatically improved by the combination of increased AF sensor density, and refined tracking algorithms.
Battery life
The Sony SGDVBT008 FW50 has a 1100mAh rechargeable lithium ion batteries and comes with a micro-USB input and cable. It also uses an AC wall charger, which is handy. It comes with a manual explaining how to get more life out of the batteries. There are several factors that can affect battery life. Temperature of the air around your camera is one factor. You can also use the screen for autofocus, zoom and other purposes. Other factors that impact battery life include optical image stability.
LCD screen
A cracked LCD screen must be replaced. Protective camera cases or screen protectors can be purchased to prevent this from happening. You won't need to replace the entire LCD screen. In addition, it will be much easier to replace a cracked screen than a broken one. You can refer to the manual if you have problems with the LCD screen.
Flash built-in
Although there are many great features in a flash built into a Sony camera, few cameras on the market offer them. The flash of the V860IIS has two modes, master and slave. There is also a backlight mode button. Even though it doesn't come with a flash, it is sufficient for most basic photography needs. Here are the cons and advantages of cheap Sony cameras with builtin flash. Below are their details:
FAQ
What makes a good camera backpack?
Choosing a camera bag is important because it protects your gear while traveling. These are some important things to keep in mind as you choose a bag.
-
The bag should be large enough to comfortably hold your accessories and cameras. Don't purchase more than you are going to use.
-
Durability: You should look for bags made from durable materials, such as canvas, nylon, leather, and polyester. Avoid plastic and fabric bags.
-
Protection: Make your bag waterproof against dirt, moisture and scratches
-
Organization: Organize your gear by type so you can quickly access what you need. So, you can place your lenses in one box, your memory cards in another and your battery charger in a third.
-
Comfort: Avoid carrying around a bulky bag when you are shooting. Instead, carry a shoulder belt. Also, look for a comfortable design with padded straps.
-
Price: Check around to find the best prices. Some brands sell their products at discount prices, which can be an added bonus.
-
Warranty: Find out whether the company offers a warranty. This will ensure that you are able to contact the right person if something happens to your bag.
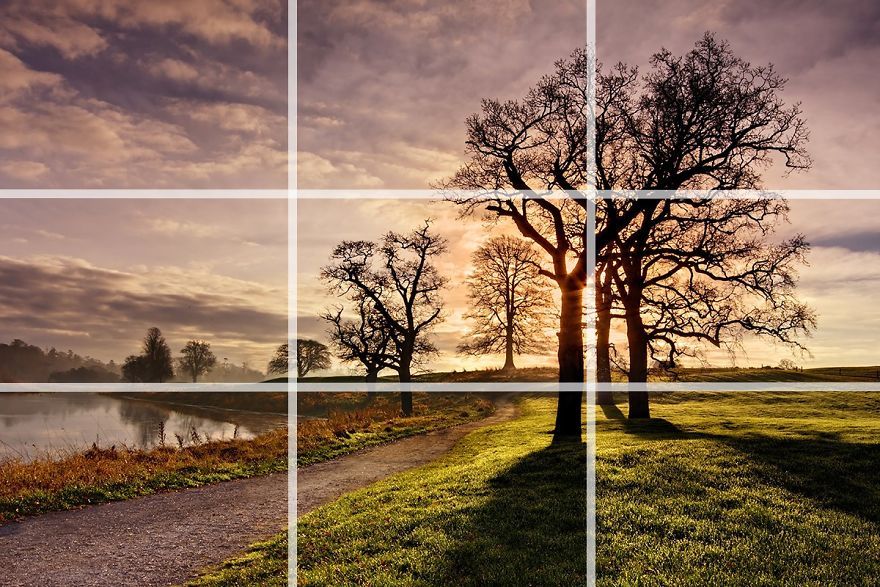
What is the rule of thirds in photography?
The rule of Thirds allows you to create unique compositions with minimal camera settings. It divides the image horizontally or vertically into nine equal pieces. This creates three main areas in which you want your subject. These are the top (3rd from the left), middle (3rd from center) and bottom (3rd from lower right). These areas are useful for positioning your subject in your frame.
The rule of threes can also help you avoid placing important items too close together. If they are too close to each other, it may be difficult for them to make a strong visual impression. They may lose focus if they're too far apart.
How can I look great in photos?
The best way to ensure you look good in photos is to take them yourself. You will learn how to pose, which angles are flattering and which are not. Learn how to use lighting, props and other tools to enhance your natural beauty.
You'll learn how to find clothes that fit and make up that looks great on your skin.
If you are not happy with your results, we will show you how you can retouch them using Photoshop and other editing tools.
Don't be afraid to take some self-portraits.
Do I Need A Tripod?
This is one of those common questions. While a tripod isn’t necessary every time, it is useful.
It helps you keep your camera steady while taking pictures at slow shutter speeds. Tripods can be a huge help when you are shooting landscapes or stationary subjects.
On the other hand, if you're photographing moving subjects such as sports or people, using a tripod can cause blurriness. How do you determine which situations need a tripod?
A tripod is an essential tool for photographing fast-moving subjects or stationary objects. Examples include:
-
Sports
-
People
-
Landscapes
-
Close-ups
-
Macro shots
If you're unsure whether you need a tripod, try this test. Hold your camera still and look through the viewfinder. You will need a tripod if you see blurred lines and movement.
A tripod will not improve blurring if you don't notice it.
If you do decide on a tripod purchase, these are some things to remember.
-
Make sure your tripod has smooth legs. This prevents unwanted vibrations from shaking your camera.
-
You should choose a sturdy tripod. Some tripods may be made from plastic, which can make them less durable. Opt for a sturdy metal tripod.
-
A remote release is a great option. This lets you control your camera remotely. You can set it to fire the shutter once you press the button automatically.
-
Try to find a tripod with a head that rotates 360 degrees. This makes it easier to position your camera vertically or horizontally.
-
Keep in mind that tripods aren't cheap. Expect to pay $100-200. But, you will get a lot for your buck.
-
Accessories such as memory cards and filters are important.
-
Before you buy online, make sure to check your local shops. Many retailers offer free shipping.
-
You can read customer reviews to see what people think of a product.
-
Ask friends and family members who own similar products.
-
Visit forums and message boards to learn about customer experiences.
-
Look online for user reviews.
-
Amazon.com makes it easy to compare prices and see customer feedback.
-
Check out these photo galleries for an example of the work that photographers do with their tripods.
Statistics
- In this case, 100% of readers who voted found the article helpful, earning it our reader-approved status. (wikihow.com)
- The second easiest way to get blurry photos 100% of the time is to use a cheap filter on the front of your lens. (photographylife.com)
- Get 40% off Adobe Creative Cloud(opens in new tab) (creativebloq.com)
- This article received 13 testimonials, and 100% of readers who voted found it helpful, earning it our reader-approved status. (wikihow.com)
External Links
How To
How to take pictures in low lighting conditions
Low-light photography can be defined as taking photos in dimly lit and dark environments. This requires special equipment and techniques. The main challenges are controlling exposure, white-balance, and sharpness. There are two kinds of low light photography. Flash photography works best when there's enough light around. If there isn’t enough natural lighting, you will need to use a flash. A flash might be necessary if you are photographing a subject indoors and outside. If you don't want to use a flash, try shooting at night during the moonlit hours. You will get beautiful shadows and colors. Another option is shooting at twilight. Twilight happens when the sun has set but there is still daylight.
You may also want to experiment with long exposures. Long exposures can be used to capture images even if the shutter has been closed for several minutes. The shutter must be closed so that the camera only records light that hits the sensor. This light continues to fall onto a photo sensor throughout a prolonged exposure. But, the shutter remains closed and no new light enters. You will see very little movement as a result. To ensure you're getting a clear image, turn off any automatic settings like autofocus and auto exposure. Before you begin shooting, adjust your ISO setting. An ISO setting 200 gives you more control over how bright or dim your image appears. Once you are ready to click the shutter button, make sure it is fast. This will bring the shutter completely to a close. Then, you should hold the shutter button until the last possible second. To prevent additional light entering the camera, hold the shutter button down. After you've taken the picture, wait a few seconds before releasing the shutter button. This allows the camera's to process the image. While you wait, your photos will be displayed on your computer's screen. Once you're satisfied with them, save them to your computer.